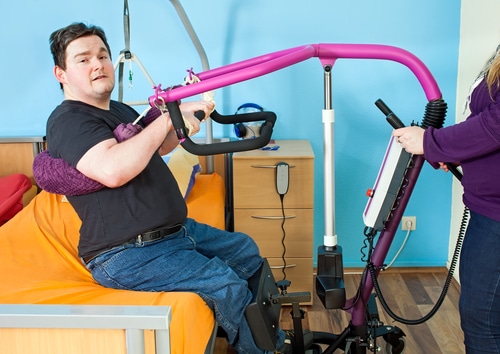
A sit-to-stand lift, also called a patient lift sling or standing hoist at times, can be useful if you have difficulty standing up from a seated position due to mobility or strength issues. If you’re a caregiver to someone with limited mobility, it can also greatly assist in helping you get your patient into a standing position.
The benefits are many, including increasing your independence, making it safer to stand by reducing the risk of falls or injuries, improving your posture by allowing you to stand up straight, and providing a more comfortable and stable transition from sitting to standing.
Here’s what you need to know.
Table of contents
What is a sit to stand lift?
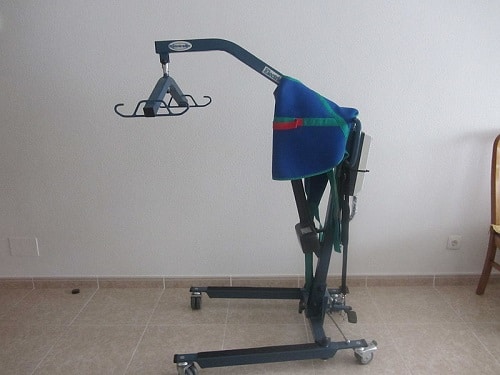
A sit-to-stand lift helps those living with limited mobility or physical disability to transfer from a seated position to a standing position, or vice versa. Patients and caregivers use them in hospitals, nursing homes, and home care settings.
Manufacturers typically construct the lift with a metal frame and attach a sling or harness to it to support the person during the transfer (hence the term patient lift sling). The lift may be manually operated or powered by electricity or battery and may have various features such as adjustable height and width, safety locks, and brakes.
Using a sit-to-stand lift can prevent injuries to both the person being transferred and the caregiver who’s providing the assistance. It can also promote independence and improve your quality of life.
Suppliers of these devices in Australia include Haines Medical , Aidacare and Mobility Caring.
Types of patient lift slings
There are several types of sit-to-stand lifts available and – as with any type of mobility equipment – the right type for you will depend on your specific needs and physical abilities. Here are some of the most common types:
Hydraulic sit-to-stand lifts
These lifts use a hydraulic system to help raise and lower you. They’re often manual and require a caregiver to operate them.
Electric patient lift sling
You can power these lifts with electricity and operate them using a remote control or a control panel located on the lift itself. They’re often more expensive than hydraulic lifts but require less physical effort to operate.
Stand-assist lifts
Designers have created these lifts to help those who are able to bear some weight on their legs but require assistance standing up. They usually have a sling or seat that supports your weight and helps you to stand up.
Bariatric sit-to-stand lifts
Designers create these lifts to accommodate you if you’re overweight or obese. They have a larger lifting range than standard sit-to-stand lifts and a higher weight capacity. On the latter, find out about bariatric wheelchairs too.
Portable sit-to-stand lift
Designers create these lifts to be lightweight and easily transportable, making them ideal for use in home settings or during travel.
Combination sit-to-stand and patient lift sling
You or your caregiver can use these lifts for both sit-to-stand transfers and full patient transfers. They’re suitable for use in hospital or long-term care settings.
How to use a sit to stand lift
How you use a sit-to-stand lift depends on what type of lift it is. You and your caregiver should always carefully follow the manufacturer’s instructions when using one. Though each lift may vary, here are general instruction for how a caregiver must use a sit-to-stand lift:
1. Position the lift
Your carer must move the lift to the side of the chair where you’ll be sitting, making sure it’s stable and secure.
2. Attach the sling or seat
If the lift has a sling, they must attach it to the lift’s hooks and ensure that it’s properly positioned under you. If the lift has a seat, make sure your carer sits you comfortably with your back against the backrest.
3. Adjust the height
Your caregiver must adjust the height of the sit to stand lift so your feet are firmly on the ground and your knees are bent at a 90-degree angle.
4. Secure the user
They must then make sure your feet are properly positioned on the footplate or floor, and adjust the lift’s straps or safety belts to secure you in place.
5. Activate the sit to stand lift
Depending on the type of lift, your carer must activate it either by using a remote control or by pressing a button on the lift itself. The lift will slowly raise you to a standing position.
6. Assist the user
Once you’re standing, they assist you in turning and taking small steps towards your destination.
7. Lower the lift
When you’re ready to sit down, your carer should slowly lower the lift by pressing the button or using the remote control until you’re seated in the chair again.
8. Remove the sling or seat
If the lift has a sling, your caregiver should carefully remove it from the hooks. If the lift has a seat, they should assist you in standing up and moving away from the seat.
9. Store the lift
Lastly, they should move the lift to a safe and secure location until it’s needed again.
Read more about transfer options and beyond with some popular articles from our blog:
- Ways to Make Transferring from Your Wheelchair to Car Easier
- Lifts and Hoists for Converted Vehicles
- Swivel Seat for the Car: How It Can Increase Independence
- Mobility Equipment Storage and Transfer Options for Vehicles
- Stand Up Wheelchairs – What You Need to Know
- Features To Look for When Buying a Converted Car or Wheelchair Accessible Vehicle
Insurance for your specific needs
If you rely on a wheelchair, mobility scooter or disability converted vehicle to get around, you know how valuable these assets are to your independence. Blue Badge Insurance is a specialist in insuring mobility equipment and vehicles.
Check out our wheelchair insurance and our mobility equipment insurance, for starters.


